This elf cookie tutorial is courtesy of our contributor Amy of BZ Bees Sweet Treats…Happy December! Has your Elf arrived yet from the North Pole? These sweet treats would be the perfect companion for his/her first appearance or a silly prop for the next 25 days of fun.
I’m a pretty impatient cookie decorator, so I tried to come up with an Elf on the Shelf design process that could be completed in an afternoon. You’ll need a few colors for this project, but aside from the cookies, icing, and a few toothpicks, no other tools or supplies are necessary.
Elf Cookie Tutorial – What You’ll Need:
- Elf shaped cookies (sugar cookie recipe) – I purchased this adorable cutter from Truly Mad Plastics
- Red 15 second icing (royal icing recipe)
- Flesh toned 15 second icing (I used a teeny dab of copper and a touch of warm brown)
- White 15 second icing
- Blue flood icing
- Black flood icing
- Brown piping icing and 15 second icing
- A scribe tool or a few toothpicks
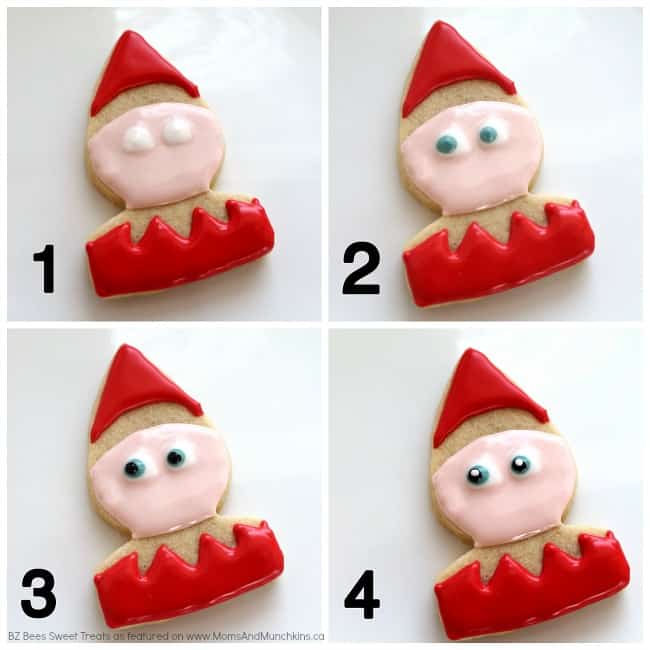
Start by outlining a curved cone shape at the top of your elf and fill in using with red icing.
Next, draw a zig zag across the bottom portion of your elf and fill in the area beneath. Use your scribe or toothpick to push the icing into the smaller areas.
Using your flesh toned icing, create a flattened circle shape for the face. Leave an empty band between the face and hat approx 1/3 inch wide.
While this icing is still wet, add in two gumdrop shapes using your white icing. Immediately add two blue dots on the left edge of the white. Follow with a smaller dot of black icing in the center of the blue. Finally, add a reflection using a tiny drop of white at the upper right corner of the black dot. You’ll have to move quickly so the icing dries evenly. Feel free to complete one eye at a time if you prefer.
Give your cookie a gentle shake to help the icing smooth out. Let your cookies dry for about 30 min before moving on.
Add a tiny drop of flesh toned icing to make your elf’s nose.
Follow with a small dot of red icing for the mouth. Use your scribe or toothpick to drag the side of your red dot outwards and upward to create a sweet smile. Be gentle here! The icing isn’t completely dry and you can easily crack the face if you poke too hard.
Add the eyebrows using the brown piping icing. Then squeeze out a little blob of the black flood icing onto a clean work surface. We’ll be using this to “paint” on the eyelashes. I prefer this method to piping them on because you can create really fine lines. You can also draw the eyelashes on with a black edible ink marker, but you have to wait a full 24 hours for the icing to be completely dry.
Dip your scribe or a clean toothpick and draw three tiny curved lines at the upper right hand corner of each eye; dipping back into your black icing blob as needed. Again, be gentle so you don’t crush the face!
Outline your hair in three sections using the brown piping icing, and then fill in with the 15 second icing.
Once the hair is dry, fill in the empty areas with your white icing. Add a dot on each side of face for ears and you’re all set!
I brushed on some pink petal dust to create rosy cheeks, but your elf will be just as cute without it and certainly ready for a month of mischievous elf antics!
Here’s hoping your Elf gives Santa a good report each night! Happy Holidays!
We’d like to send a big THANK YOU to Amy for sharing these cute elf cookies with us. Be sure to follow her on Facebook & Instagram for adorable cookie decorating ideas. I first came across her beautiful cookie creations on Instagram and I was immediately a fan of her work!! Have a special celebration coming up? You can also order cookies from her! Check out the FAQ section of her website for more information.


Great tutorial. I hope to try these for my friends very soon. Thanks for sharing