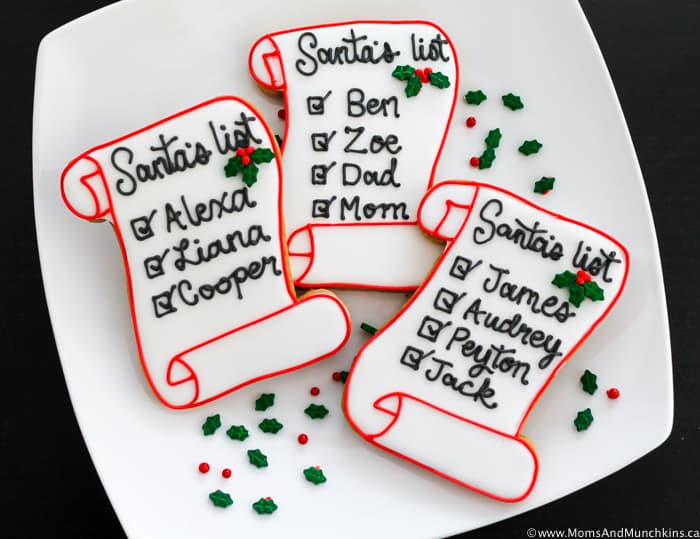
This cookie decorating tutorial for Santa’s List Cookies is courtesy of our contributor Amy of BZ Bees Sweet Treats…He’s making a list, he’s checking it twice. Will Santa give you the green light this year or will it be a stocking full of coal? Have no fear….with these simple cookies you’ll always be on the nice list!


Santa’s List Cookies – What You’ll Need:
These cookies are really so simple to make! The key is just a few lines to add that rolled look to Santa’s scroll.
- Diploma or scroll cookies baked and cooled using the recipe of your choice (I used a 4 inch diploma cookie cutter from Truly Mad Plastics, but you can order a similar scroll cutter here)
- White 15 second royal icing
- Red piping icing fitted with a Wilton tip 2
- Black piping icing fitted with a PME tip 1.5 (or a black edible ink marker)
- Wilton holly sprinkle mix

If you follow along with my other tutorials, you might notice these cookies are slightly darker. I used Lorann’s coffee emulsion for flavoring my dough. Can you say YUMMMMM?!?! Not only do the cookies taste amazing, but they have a nice almost gingerbread color without all that sticky molasses.


Outline your entire cookie using the white icing. If you are using tipless piping bags like I am here, be careful not to cut the hole too large. You can also outline and flood with a Wilton tip 2 if you prefer.


Immediately flood the cookie with white icing and use a toothpick or scribe to gently distribute. Allow the cookies to dry at least 1 hour so the icing has time to crust over.

Using the red piping icing, pipe a line from the top of your cookie straight down the left edge.

Continue piping down along the bottom edge, around the lower bump and back across towards the left. Stop piping about an inch away from your left edge line and curve the icing down and back around to the right. Your icing should form an L shape with a slight hook.

Start where your L begins to curve, and pipe another curved line down to the bottom of your cookie. The red lines should create a somewhat curved number 4 shape.


Pipe an outline on the remainder of the cookie.

To complete the top portion of Santa’s scroll, add a backwards 7 shape on the top bump of the cookie. Allow the piping icing to dry completely before moving on.


Pipe “Santa’s list” across the top edge of your cookie. I prefer piping almost all my text with a PME tip size 1.5. PME tips have no internal seam so the icing won’t curve as you pipe. If you aren’t comfortable piping on the text, you can also write directly on your cookie with an edible black marker. Just be sure to let the cookies dry completely (preferably overnight) before attempting. If your white icing isn’t completely dry, your marker may cause dents or pits in the icing.


Add the list of names. Three to five names should fit depending on how large you pipe/write.

Pipe or draw a square next to each name.

Add a checkmark or an “X” to each box. Luckily, everyone on my cookies ended up on Santa’s “Nice List”, so they all got checkmarks!


I used these adorable holly sprinkles to add a quick decorative accent. So fun right?


Pipe a tiny blob of red icing just under “Santa’s list”. Immediately press a leaf into the icing. Repeat to add two more leaves.
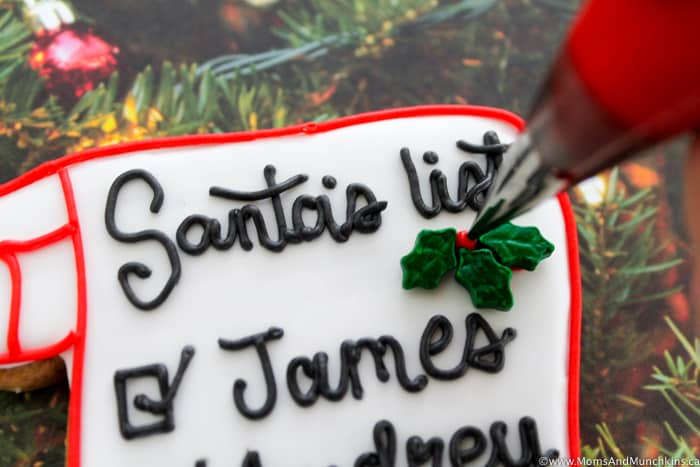
Pipe three red holly berries at the center of the leaves. You can add the berry sprinkles, but they sure are hard to grab!

And there you have it! These adorable cookies would make the perfect stocking stuffer for anyone on your list!

We’d like to extend a big THANK YOU to Amy for sharing these pretty cookies with us. Be sure to follow her on Facebook & Instagram for adorable cookie decorating ideas. You can also order cookies from her! Check out the FAQ section of her website for more information.