This personalized Easter egg cookies decorating tutorial is courtesy of our contributor Cherylin…St. Patrick’s Day was just a few days ago and we’re already full speed ahead with Easter ideas! These cute personalized Easter egg cookies would be great for Easter baskets or as a party favor. You can customize the colors to match any party theme plus it’s a treat that both kids and adults would love!

Personalized Easter Egg Cookies – What You’ll Need:
- Egg with Ribbon cookie cutter from The Sweet Designs Shoppe (I used the Regular size)
- 5 – #2 tips the ribbon and base egg colors
- 5 – #1 tips for fine details
- 5 pastry bags and couplers
- Wilton sky blue, pink and lemony yellow gel color
Preparing to Decorate:
Using my favorite sugar cookie recipe, prepare and chill the cookie dough for one hour.
Once chilled, roll out the dough using a rolling pin and use the egg & ribbon cookie cutter to cut out the shapes. Chill cut shapes for an additional 30 minutes to reduce spreading during baking.
Once the cookies are baked and cooled, prepare Sweetopia’s royal icing. Note that 1 batch of icing covers about 3-4 batches of the above cookie recipe. The icing recipe can be halved or even quartered depending on your needs.
Seperate the icing into 5 bowls and add color to each using a toothpick dipped in the gel color. For green, I like to mix my own with the Wilton sky blue and lemony yellow. This makes it blend with the palette.
Separate ¾ of each bowl of colored icing into additional bowls and thin these icings down to 20 second icing, as explained by Sweet Sugarbelle. This will be used for the base of the egg and the ribbons.
Fill 5 piping bags with the 20 second icings, and cover the stiffer icing with a lid or wet towel to keep from crusting over.
Personalized Easter Egg Cookies Decorating:
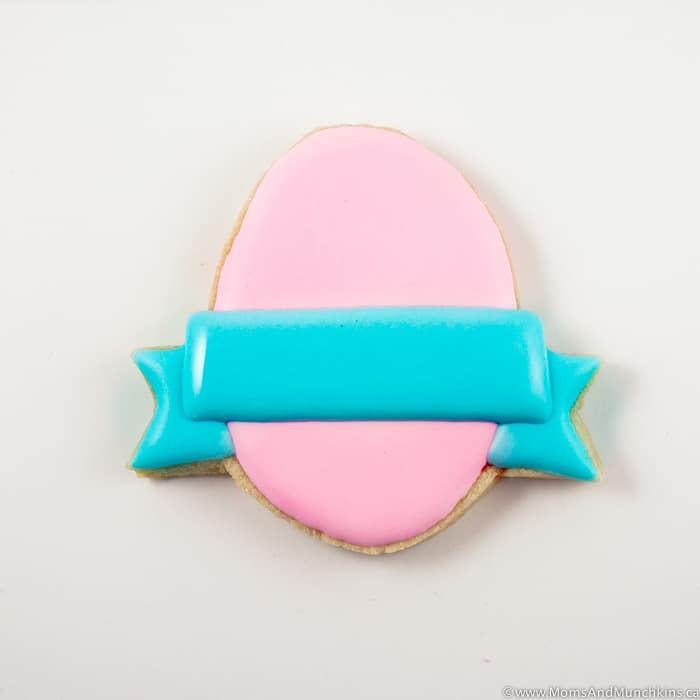
Take the pink 20 second icing, and pipe and fill the shape of just the egg. Allow to dry for 3-4 hours.

Take the blue 20 second icing, and pipe the sides of the ribbon. Allow to dry completely (an additional 3-4 hours).

Starting at the top of the squared off ribbon, pipe the rectangular ribbon across the egg. Allow to dry before piping on the name. Tip: You can use a food safe marker to write the name on prior to piping for spacing and placement.

Fill piping bags with the stiffer icing left in the bowls to pipe on the details. Add names, dots, stripes, swirls and chevrons in an array of patterns to create custom egg designs!

We’d like to send a big THANK YOU to Cherylin for sharing this creative cookie decorating tutorial with us. Follow her on Instagram for even more creative cookie decorating ideas.