These Elmo Flower Cake Pops are courtesy of our contributor Karen of Cake Bites by Karen…Do you have an Elmo-lover in your life? Well, they’ll love these flowers and they’re not as hard to make as you think!
Elmo Flower Cake Pops – What You’ll Need:
- cake balls (these can be made using cake pop dough or baked in a cake pop pan)
- cake pop sticks
- candied eyes
- orange jelly belly candies
- yellow fondant (or white fondant mixed with yellow colour gel)
- red chocolate melts
- dark brown chocolate melts
- toothpicks
- Styrofoam block or cake pop stand
- narrow glass cups
The Elmo Flower Cake Pop is really a two-part project. I got the idea from an article I found in Better Homes and Garden, which featured a flower cake pop, and an Elmo cake pop I saw on Bakerella’s website (all hail the queen of all cake pops).
PART ONE: ELMO
First, dip your cake pop stick about one inch into the melted red chocolate. Push the chocolate-covered end of the stick into the cake ball and let it dry until the chocolate hardens.
Next, submerge the cake pop into the melted red chocolate by dipping the pop straight down until it touches the stick. Remove it upwards, turning it to the side to let any excess chocolate drip off of the pop.
Push the red cake pop into a Styrofoam block or a cake pop stand to dry.
Once the pop is dried, you have two options: You can decorate the smooth pop with Elmo’s eyes, nose and mouth or embellish the pop with some muppet fur. What’s the difference… well, a whole lot of extra time. The smooth Elmo face looks just as good but for an extra gold star, I’ll show you how I did the fur.
Elmo’s Mouth: Whether you do fur or keep the pop smooth, affix the mouth on next – it will give you a good idea of where to place Elmo’s eyes and nose. Take your dark chocolate melt and either split it into two with a knife or because I didn’t want such a huge mouth (as I was only using the top portion of the cake pop), you can cut a third off of the chocolate and use a smaller piece like I did.
Now because I wanted Elmo’s face to be in the centre of the daisy flower, I only decorated the top of the cake pop to save some time.
If Adding Fur: Take your red cake pop and dip a toothpick into the red chocolate. Drizzle the chocolate from the toothpick onto the cake pop, dabbing and dragging the toothpick until you get a fur-like appearance. Another reason I placed the mouth on first is because I try to layer the chocolate around the mouth so that it’s not sticking out in mid-air and looks a bit more realistic – but again this whole fur step is optional.
Elmo’s Eyes and Nose: Take some red chocolate and (with the toothpick) drizzle a small amount of chocolate over where you wish to place the eyes on the pop. Then just stick them on. Do the same with the jelly bean for his nose.
PART TWO: THE FLOWER
Being a newbie at this baking game, fondant is currently my mortal enemy but I pressed through with this project – though it took many, many attempts.
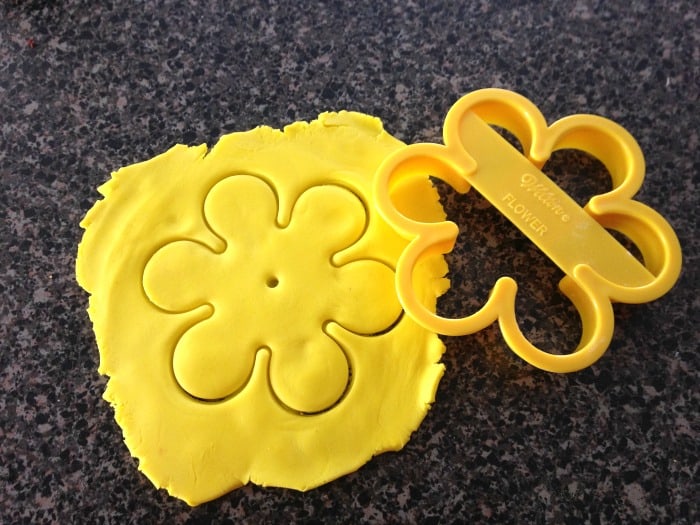
I bought white fondant and added yellow colour gel to make the fondant yellow but to save time, just buy yellow fondant. Kneed and work the fondant until it’s softened and roll flat – I used icing sugar to cut down on the stickiness of the fondant – DO NOT use flour. Once flat, cut the fondant with the flower cookie cutter and use one of the cake pop sticks to make a small hole in the centre.
Take your Elmo cake pop and pass the stick through the centre hole. I put an extra bit of red chocolate at Elmo’s bottom and pressed the fondant around the cake pop.
You can stop there but I placed the Elmo pop in a narrow glass so the flower would have a nice curve around the pop as it dried.
And there you have it – Elmo Flower Cake Pops! Present a couple of them in a vase or individually for the perfect gift or treat!
On a Personal Note: 6 years ago we lost my nephew – he was only 3 at the time. He absolutely loved Elmo! So for his incredibly brave family, I sent them 6 Elmo flowers to represent every year he’s spent in heaven. They absolutely loved them and it brightened their very difficult day.
In honour of my first post for Moms & Munchkins, I thought I’d dedicate this article to him and his family.
We love you Zackie. Hope you’re having a blast in heaven! Thanks for the inspiration.
Thank you to our contributor Karen for this adorable tutorial! This is Karen’s first post as part of the Moms & Munchkins team and we’re excited to welcome her to the group. Check out more of her cake pop creations on her Cake Bites by Karen Instagram page.


