This Big Hero 6 Marshmallow Baymax post is courtesy of our contributor Dawn…Hello everyone! We absolutely loved watching Big Hero 6 when it first came out in theatres so of course, we couldn’t wait to see it again on DVD. In fact, the little one wanted to turn it into movie watching party, and of course, I obliged.
Today, I’m sharing one of our pre-movie-watching activities. Each child made their own marshmallow Baymax! They were easy and fun to make and a perfect pre-show craft.

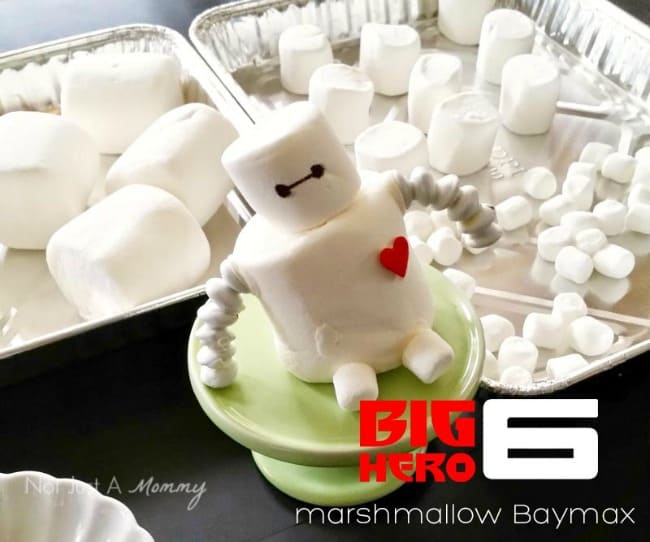
Big Hero 6 Marshmallow Baymax – What You’ll Need:
- regular marshmallow (head)
- jumbo marshmallow (body)
- 2 mini marshmallows (feet)
- 1 jumbo heart sprinkle
- 10 white M&Ms (or white chocolate drops from Party City)
- white candy melts
- black food marker
How to create Baymax’s body:
- For simplicity, before the party, I drew on Baymax’s facial features with the black food marker onto regular marshmallows.
- Melt the white candy melts according to the directions and use them as your ‘glue’ to attach everything.
- Stand up your jumbo marshmallow and with dabs of candy melt, add on two mini marshmallows for feet.
- With a tiny dab of melted candy, add the heart sprinkle.

How to create Baymax’s arms:
It is easier to build up Baymax’s arms in segments rather than trying to stick them on one at a time.
Each arm is made up of 5 white M&Ms.

- With small dabs of melted chocolate, attach 2 M&Ms together and repeat with 2 more M&Ms. Once cool, attach the 2 sets of M&Ms to each other and attach the 5th M&M. To create a little curve in the arm, attach the sets to each other at a bit of an angle.
- Repeat step 5 to create the second arm.
- Attach the arms to the marshmallow body with another dab of melted candy. This is where you need a little patience, you have to hold up the arm to the body until the melted candy cools and ‘glues’ it to the body.

Because we had so many treats at our party, we sent their marshmallow creations home…but from what I hear, most of them never made it there.

Need more Big Hero 6 party ideas? Be sure and stop by my blog and check out the rest of our Big Hero 6 Party.

We’d like to send a big THANK YOU to Dawn of Not Just A Mommy for sharing this adorable tutorial with us. How awesome would it be to have a movie viewing party for your favorite movie? Such a fun experience for the kids and I bet it was really fun to plan too! Over on her blog you’ll find plenty of party inspiration – so many clever ideas that she makes easy to recreate for yourself! Be sure to follow her on Facebook, Pinterest and Twitter for even more creative ideas.
This is adorable! Sharing your link with my grandson 😉
Thanks for sharing this cute recipe. This week I curated “fun foods” for the Family Fun Friday Linky party—and YOUR recipe will be a featured post. Please stop by brittalafont.com (food hostess) to grab your “I was featured” button and link up again after Thursday at 1 pm, PDT. Already pinned it! 🙂
Thank you so much for the feature, Britta!