This Back To School Cake Pops tutorial is courtesy of our contributor Karen of Cake Bites by Karen…It’s the most wonderful time of the year! You know the commercial. The mom gleefully prances through the aisles in the Staples commercial as her kids sluggishly drag themselves behind her – supposedly dreading the return back to school. But with all the hustle of getting new supplies, outfits and registration, I have to wonder if this season is really that wonderful. I mean yeah, you finally get them out of the house and off of the couch (no more…. MOM, I’m bored) but with all the extra prep, who has time for anything much more rolling cake pops. Cue in Karen’s shortCUT to cake poppery (I’m using a fancy term I created – and you gotta love the pun).
If you don’t know by now, I’m always looking for a way to CUT corners (ok, I’ll stop now because it’s getting extremely cheesy). I’m always trying to find a way that’s easier for the busy mom (whether you’re a stay-at-home mom or a working mom, you are just flat out always busy).
Back To School Cake Pops – What You’ll Need:
- cake pop dough (whatever recipe you are comfortable with)
- wax paper
- any coloured melting chocolate
- cookie cutters (optional)
- paring knife (optional)
- candied eyes (optional)
- bowl or cup for melting chocolate + dipping
- piping or Ziploc bag for decorating (optional)
- toothpicks for decorating (optional)
- treat sticks
STEP ONE:
Take your cake pop dough and roll it into a palm-sized (large) ball. Try to roll it as smooth as possible, packing it in tight. Next, flatten the ball. You can make your pop as thin or a thick as you want but just note that if it’s too thin, it won’t stay on the stick – if it’s too thick, you’ll probably have more of a challenge to get a cookie cutter through the dough as well as it may be too heavy for the stick and fall off. I aim for around ½ inch of thickness when creating these.
STEP TWO:
Cut out your cake pop shape(s). You can use cookie cutters or a simple paring knife and trace over something (like your kid’s toys lol) or you can cut out something freehand. Just remember to wash your kid’s toys thoroughly if you use them or be normal and use anything else. {wink} Once your shape(s) is/are cut out, place in the fridge to firm up (not freeze). You can prepare beforehand (overnight or in advance) before dipping but just make sure they are not too cold before you dip otherwise the cold pop and hot chocolate will produce cracks in your final product.
STEP THREE:
As per cake pop norm, you can start dipping. Dip the tip of your stick into chocolate and insert into your shaped cake pop dough.
SECRET STEP:
This is really a step for any cake pop recipe but I’ll share it in this tutorial. Every so often when you insert you cake pop stick into your dough, you meet up with the inevitable crack. It happens to all of us but here’s a way to fix it. Take some melted chocolate and plaster/fill the crack with the chocolate. Make sure it is a smooth plastering. Let it dry and then you’ll be ready for your “full dip.”
STEP FOUR:
You might want to make sure that whatever vessel you’re using to melt and dip your chocolate in, can accommodate the shape you’ve created – i.e., for wider shapes, use a wider bowl. Melt and stir your chocolate until smooth before dipping your shape. I can’t emphasize how much patience there is in “cake popp’n.” Take the time to make sure your chocolate is smooth. I’ve rushed it so many times on this step and the times that my chocolate is smoothest is when my pops turns out the best. Use paramount crystals or shortening to thin out your chocolate to help with the smooth consistency, if necessary.
Dip your pop(s) and let dry for decorating.
STEP FIVE:
So for this tutorial, I went with a Back-To-School theme for my pops but obviously you can decorate your pops anyway you want.
Crayon Pop – I cut out a narrow rectangle shape and cut two triangle pieces off the top to make a sharp point. I dipped it into chocolate, drew two black lines and a wide oval in the middle of them with black chocolate and voila! You can either draw the crayon features by piping the details with black chocolate or just use a toothpick to draw in the lines and oval.
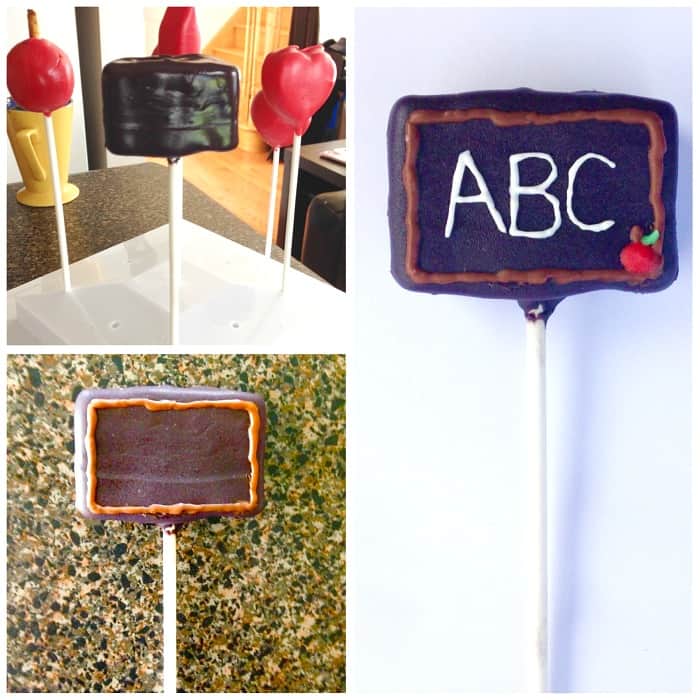
Blackboard Pop – I cut out a rectangle and dipped it in black. Once dried, I took some brown chocolate to outline the border and took white chocolate for the letters.
Happy Face Pop – I cut out a circle and dipped it in yellow chocolate. Once dried, I added some candied eyes and black chocolate for a smile. This is a fun one to do with kids.
The ideas for different cut out cake pops are really endless and if you’re super busy and haven’t figured this out yet, you can simply bake/buy a whole cake and just cut out shapes turning them into pop without the cake dough hoopla.
These are a fun treat and great way to start a new school year. Happy popping everyone!
Thank you to our contributor Karen for this fun cake pops tutorial! Check out more of her cake pop creations on her Cake Bites by Karen Instagram page.


