This post is courtesy of our contributor Ivelina…Does your family have any traditions for Remembrance Day? Do you attend any of the ceremonies? Do you do any crafts with your kids? Today Ivelina shows us how to make these beautiful poppy cupcakes.
Poppy Cupcakes Instructions:
Step One: Knead the gum paste until soft and pliable. Add the red colouring and continue kneading until the desired colour is achieved. Make sure you have red coloured gum paste for the petals and a small quantity of dark green and black gum paste for the seed pod.
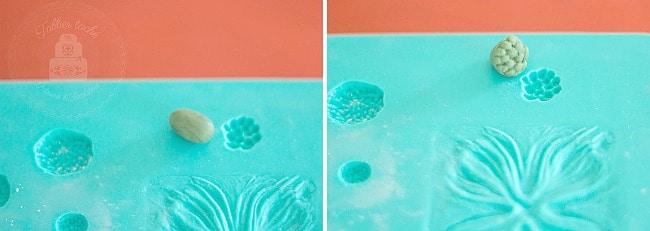
Step Two: Form a small oval from the green paste. Press against a mold to form the seed pod of the poppy. If mold is not available, form a small cone shape. With a toothpick, draw some lines around the base of the cone.
Step Three: Have the black gum paste rolled long. Press it down with a rolling pin towards a silicone mat. Roll it out in a long ribbon. It is not important to have the ribbon uniformed. In fact, the different width will give a nice natural look to the stamens of the poppy. Let the ribbon dry a little bit so you can handle it through the next procedure. Cut small thin lines through the whole ribbon, forming the stamen bunch. Twist the stamen ribbon around the seed pod. Use a small damp brush to lightly wet the bottom of the pod so the stamen attaches properly. Set the assembled poppy center in a place where it can dry well.
Step Four: Form four balls from the red gum paste. Two of the balls should be bigger for the outside petals. Work the petals one by one. Keep the rest of the balls covered with foil so they do not dry out. With your fingers, press the ball forming a petal shape and roll it out thin.
Step Five: Press the petal against veining mat. Roll over with a rolling pin, thinning the petal more. If veining mat is not available, just roll the petal thin. Place over a soft surface and with a spherical tool press the edges and the center. This will wave the petal in a natural way. Leave each petal separately to dry out.
Step Six: Arrange some tools to keep the form of the petals. Prepare a small glass of water and a brush. With a damp brush, brush the bottom of the dried poppy center.
Step Seven: Attach the first small petal, pressing gently towards the wet center. Let dry for few minutes. Lightly brush the bottom of the first petal and the rest of the seed pod bottom. Attach the second small petal, opposite to the first one.
Step Eight: In the same manner, attach the big petals across the small ones. Make sure the petals overlap at the bottom. Shape them in a wavy to resemble real petals. Let the poppy dry out overnight.
Step Nine: The poppy looks pretty dull before dusting. Using powdered food colouring and a small brush, dust the petals one by one. If desired, only the petal areas close to the seed pod could be dusted.
Step Ten: Top your favourite cupcake with this poppy.
We’d like to extend a huge Thank You to our contributor Ivelina. She is an amazing baker and I know you’ll love what you see over on her Tablier Taché blog, her Pinterest boards, her Facebook page and her Google+ account.


Just beautiful!
These are lovely! And poppies have been on my mind too.
Holy Hannah! These are beautiful! Thanks for sharing!
These are beautiful! Could you let me know where got the moulds from/ or who’s the producer? thanks1