This ombre cake post is courtesy of our contributor Shayna…I like ombre cakes and there are so many ways out there to create them. Using buttercream is one of the best ways to create ombre cakes because you can easily lighten and darken it.
In this tutorial I’m going to show you how to do a technique using buttercream called the petal effect. It is extremely easy and the results are very impressive. I will warn you though that using this technique to do an ombre cake is quite time consuming. I think it’s worth it though.
You can also use the petal technique using just one color, which takes far less time and is also quite pretty.
What you need:
- A cake. I think round looks the best for this technique but square or rectangle is ok.
- Buttercream icing and lots of it. You will use 3 to 4 times the icing you would use if you were simply icing the cake smooth
- Food coloring. You just need one color.
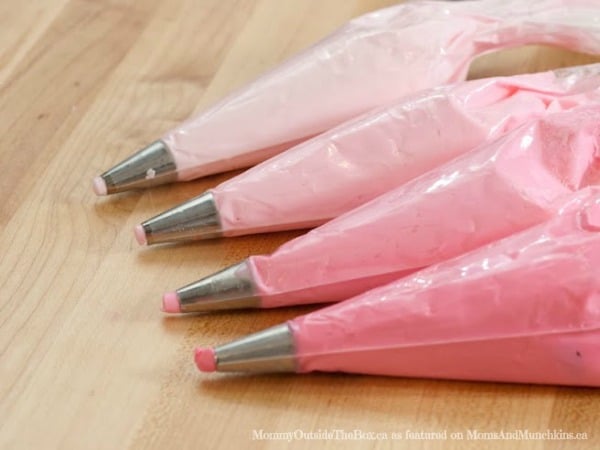
- 4 piping bags (or more if you are using more shades).
- 4 plain tips (I use a #12)
- A small offset spatula
- A turning cake decorating table is very helpful but not a must.
Ombre Cake Directions:
Put your buttercream in a large bowl. Add enough food coloring to your icing to achieve the darkest color you want to use. Put a quarter of that icing into a piping bag. Add enough white icing to the bowl to achieve the next color. Put one third of the icing into a piping bag. Continue until you have four shades of icing in piping bags. Again use a different ratio if you want to use more colors.
If you have never used the petal effect technique before I highly recommend practicing a few lines on a flat surface (like a cutting board) before moving on to the cake. When you are practicing just use one color so you can scrape it back up and put it back in the piping bag.
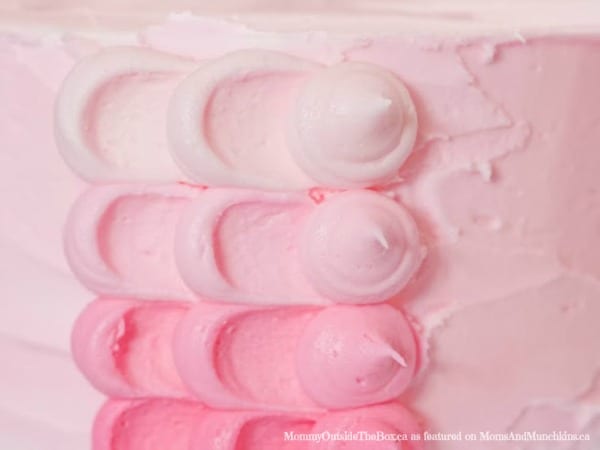
Begin by piping four dots in a row. The dots should just touch each other and be about the diameter of a quarter (you can experiment with different sizes). Grab your offset spatula and gently bring it down onto the middle of the bottom icing dot. Press down and drag. Repeat with each dot. Have a small plate handy to scrape the excess icing off your spatula.


Now pick up your piping bag and do another vertical row (or column if you prefer) of dots. Again drag with your spatula. Repeat until you feel you’ve got the technique down.


Now you’re ready to start on the cake. Give your cake a crumb coat of buttercream. I like to use my lightest color simply because I often leave the top of the cake smooth so it looks nice if it’s the same color as the last row of icing.
Starting at the bottom of the cake, pipe a dot of your darkest color. Above it pipe a dot of the next color. Repeat until you have reached the top of the cake. Note – if you have more cake than colors either start with two rows of the darkest color or finish with two rows of the lightest.
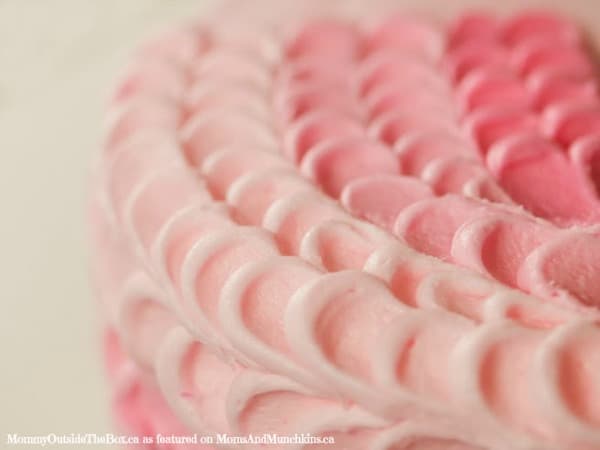
Using the technique you practiced above, cover your entire cake using the petal effect.

When you get to the last row the easiest way to finish is just with a vertical row of dots. Make that the back of your cake. It actually looks kind of cute.
As you can see here I leave the tops of my cakes flat. I like the simplicity of it and it’s also great if you are making a birthday cake and want to put some writing on top.

However if you have lots of icing left and have some time on your hands you can continue and give the top of your cake the petal effect as well.
Have some fun playing with this method. I’ve seen cakes done with the technique done going up the cake (instead of around) and you can mix it up on the top of the cake doing rows in different directions. Have fun!


We’d like to send a big thank you to Shayna of Mommy Outside The Box for sharing this beautiful tutorial with us. You can find Shayna over at her blog sharing more delicious recipes like this Apple & Brie Tart or over on her social media channels – Facebook, Twitter, Instagram and Pinterest.

Stay tuned for more delicious Sunday Sweets tutorials by following Moms & Munchkins on Facebook, Twitter, Pinterest and Bloglovin’.
so pretty! love it!
Thank you, Jennifer! Now I need an excuse to make cake!
How beautiful! I have to try this out!
Yes, it turned out beautifully! I hope to try it one day soon. Shayna makes it look so easy!
Thank you for this awesome tutorial. I have to make a strawberry cream cake and wondered how this was done. EXCELLENT!
It looks so delicious, doesn’t it! Good luck with your cake project!
It really is quite a lovely effect isn’t it? And other than taking a little bit of time it’s pretty easy, even a little fun!
Gorgeous – Would love to share with all my foodie friends – If you’re interested then head over to FoodFotoGallery dot com and submit one of your food photos (without watermarks, please).
How absolutely BEAUTIFUL!!!! The cake looks amazing!!! Love the ombre effect you created with the icing!
A beautiful cake like this wouldn’t last long in our house. I love that it requires more frosting than a traditional cake. You can never have enough frosting, right?
I can only dream of making a cake look like this! I can make a tasty cake, but the last time I tried to make one look pretty it looked like a Pinterest fail! This is gorgeous! Love the ombre and love the pink. You have some mad skill! 😀
Yes, Shayna is like a cake decorating ninja! 😉
LOL I should start a new blog – the Cake Ninja
This is such a beautiful technique! I really need to give it a try. Thanks for the tutorial. 🙂
Yes, the results are beautiful!
So pretty and so easy! I love it when cake decorating looks like it took ages but is as simple as this. Thank you so much for sharing, Cheryll. Pinning.
Yes, Shayna has a way of making all of these tutorials look so easy!
Oh my goodness! I LOVE this! I would love to try this… someday. We’ll see! lol Does it take a long time to do or once you get the hang of it, it goes faster?
Thanks for linking up to this week’s Catch a Glimpse Party. I’ll be featuring this tomorrow. 🙂
I’d imagine that you get better at it with practice…and just think of all those cakes you can eat while you’re learning the technique!
Very pretty, thanks for the tip. Thanks for sharing at The Weekend Retreat!
Thank you for the invite and I’ll see you again this week!
I love this technique! It is great for pros and newbies as well! What a pretty cake!
Yes, Shayna makes it look so easy!
Wow this is impressive! I have never been good at decorating cakes but this looks not too difficult even for me 🙂 Thank you so much for linking this recipe up at Recipe Sharing Monday. I hope to see you back next Monday. Have a good weekend!
Oh Wow! So easy to follow!
Coming from Thursday Favorite Things Blog Hop! Come-by my blog!
Thank you for stopping by, Mika!
The icing looks just amazing! I’ll have to try that technique it looks so much prettier than just a smooth traditional cake.
It looks so delicious, doesn’t it? Shayna is such a pro in the kitchen!
Great tutorial, I think I might need to use this design for daughter’s bday cake 🙂
Beautiful cake Shayna! I’m testing out some new skills soon…eep. Wish me luck!
Exactly how much frosting did you make, double recipe or…?
Well I actually just keep bulk batches of buttercream on hand (is that odd?) so I’m not sure – for this size cake (9 inch round) I’d estimate it was 1 1/2 batches of your standard buttercream recipe.
Really pretty cake!
What do you do when you come to the last row?
Hi Sara,
I find the easiest way to end the cake is to just finish the last row with some nice big dots of icing.
Es difícil encontrar su blog en el navegador, necesita backlinks con DA alta.
Sé lo que puede ayudarle. Buscar en google por:
Burol’s Tips Outsource The Work
getting the right shades of pink are difficult. Can you tell me what color you used? The same, only deeper each time, or different colors? I like that your four choices are distinctively different. Thanks–cake looks great!
Hi Ellen. I only use one color of food coloring (in this one it’s Duff Electric Pink color gel). I always start by making the darkest color and then adding uncolored icing to make the next lightest color and so on. Hope that helps!
How beautiful!! Do you have to use the crusted buttercream so it sets better? Or just regular buttercream? Amazing job!!
This is an awesome post, THANK YOU for sharing. I am new at cake decorating and only do it for the family. We (my DIL and I) are making an blue ombré cake for grandsons 1st b-day.. I have to ask, how do you contact the end.. She has been practicing but when you wrap around the cake, how to connect the row? We have been trying everything and can’t get it.. Any help would be great!