This NYC Taxi Cookies tutorial is courtesy of our contributor Samantha of The Smarter Cookie…I’m fortunate enough that I live about an hour outside of New York City. So for me it means that I can quickly pop over to see a Broadway show, take a trip through the tunnel and grab dinner in Little Italy, or take my kids to see the Christmas tree at Rockefeller Center during the holidays. NYC has some pretty amazing sights, and some pretty recognizable icons – like the yellow taxi cab. In this tutorial, I’ll show you how to make simple NYC taxi cabs.
NYC Taxi Cookies – What You’ll Need:
- 20-second icing in the following colors:
- Black
- White
- Grey
- Red
- Blue
- Yellow
- Black piping icing
My cutter was custom and came from Truly Mad Plastics. It’s actually quite large and can be purchased here. What I love about it is that it has pretty easy-to-follow lines making this an easy cookie to freehand even if you’re not the world’s best artist, like me.
Begin by outlining the shape of the taxi cab with the black piping icing. You will want the outline to be on the thicker side, so if you’re using tips, I recommend either a PME 2 or a Wilton 2. If you’re just using bags like I do, cut the tip so it’s a little larger than you normally would for piping. After you outline the outer portion of the cab, you can add in the inside details such as the bumper, space for the license plate and TAXI sign, back windshield, and tail lights. For the windshield and tail lights, follow the curve of the edge of the cutter to help create the correct shape.
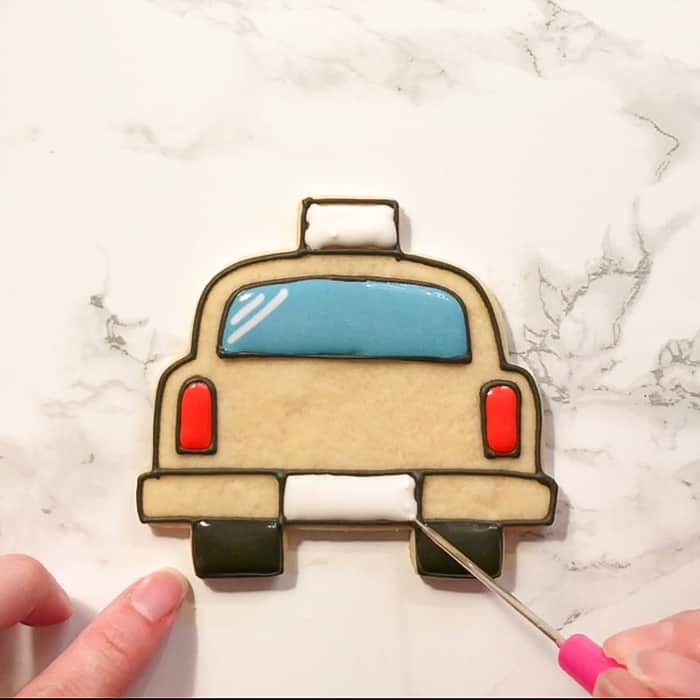
Once you let the NYC taxi cookies outlining set, you can then fill in the lines with the corresponding colors. Again, you can cut your piping bag holes are the larger side since you’re flooding, or use a 2-tip. I started with the tires. Use an offset spatula, boo boo stick, toothpick, or scribe tool to even it out and “drag” the icing to the edges. I prefer the scribe tool as it’s easy to clean and can be helpful in popping any pesky air bubbles that are created.
After the tires, I moved onto the tail lights, but you’re free to go in any order you’d like. When filling the windshield, you’ll want to work relatively quickly as you’ll apply the wet-on-wet technique to give it the appearance of glass with a reflection. Before the blue icing sets, quickly pipe white “reflection” lines in the corner making one shorter than the other. Once this layer dries, you’ll see that the white will dry within the blue icing, rather than “on top” of the blue icing layer.
From there I filled in the license plate and TAXI sign with the white icing (again, you’ll want to use a scribe tool or such to “drag” the icing to all of the edges – if your icing is on the thinner side, that may not be necessary). Fill in the bumper with grey and then complete the rest of the taxi with yellow icing.
Allow the cookie to dry so the icing is set and you no longer run the risk of color bleed. Either a few hours in a non-humid climate, or about an hour in a dehydrator will work. Once the icing is relatively “set” and “crusts over”, you can add the final details.
Using a SMALLER opening/tip (a PME 1.5, or Wilton 1) and with the black piping icing, you can write TAXI on the top and customize your license plate to whatever you’d like. In keeping with the NYC theme, I just wrote NYC18. You can also add squiggly lines on the tires to give the appearance of tread.
Finally, using the yellow icing, you can pipe a line following the contour of the back to create the trunk on both the top and bottom.
Allow the NYC Taxi cookies to thoroughly dry overnight or in a dehydrator for a few hours. Pair it with a decorated apple cookie and you too can be in a New York State of Mind!
We’d like to send a big THANK YOU to Samantha of The Smarter Cookie for this NYC Taxi cookies decorating tutorial. You’re going to love her cookie designs! Follow her on Instagram for loads of cookie decorating inspiration.


Oh my gosh I made this today and it is WonDerful!!!!! Thank you.