This Ninja Turtle paper plate banner post is courtesy of our contributor Chantelle of Dolled Up Design…One of my most popular images on Pinterest continues to be this last minute Ninja Turtle banner I created for my son’s 4th Birthday. His party that year was a Winter Olympics theme, but he was also very into Ninja Turtles at the time and requested them for his celebration at home with his grandparents. I tried to keep things cheap and simple with my paper plate and construction paper banner and, based on popularity, it proves that simple ideas are often best when it comes to parties.


As I continue to see my banner pinned and shared, I can only assume that Ninja Turtles are still a very popular theme. Because of this, I have come up with three awesomely easy DIY ideas to share, and have even created a free printable to make your own Ninja Turtle banner.
Craft Your Own Ninja Turtle Paper Plate Banner:
I have made it easy to create your own Ninja Turtle banner by designing these printable masks and mouths to attach to your own green 7” dessert sized paper plates. All you need is to print out this Ninja Turtle Banner file, cut out the shapes and glue to the plates.
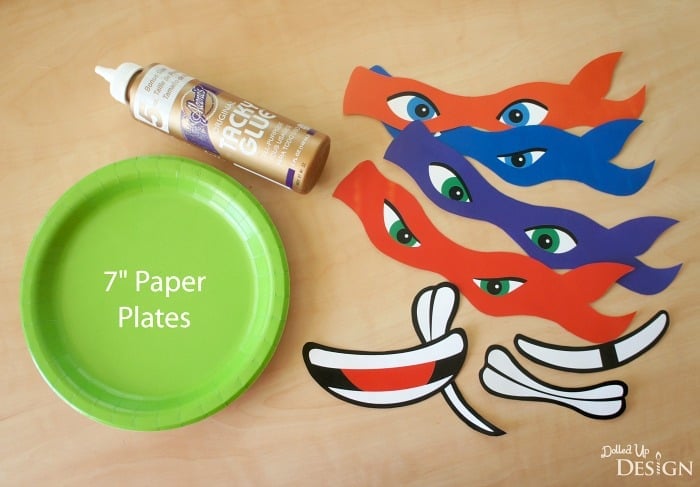
These could be put up individually as decoration on the walls using 3M command strips or double sided tape.

To make them into a banner, I used a hole punch to punch holes below each mask and strung them together using inexpensive ribbon.

Bake Up Some Ninja Turtle Cupcake Poppers:
If you can bake and ice a cupcake, I promise you can make these adorable Ninja Turtle cupcake poppers. They are made from a boxed cake mix and filled with a basic buttercream icing. The most complicated part of the process is getting all the icing colors right.

For the Cupcakes:
- White cake mix + ingredients asked for on box (eggs, milk, oil)
- Mini cupcake pan + paper liners
- Green gel food coloring
- Prepare the cake mix according to directions on box.
- Mix in the green food coloring so the batter becomes the color of a Ninja Turtle.
- Line mini cupcake pan and pour 1 full TBSP of batter into each liner.
- Bake cupcakes at 350 F for 9-11 minutes.
- Transfer and cool cupcakes on baking rack for at least 30 minutes.
- Once cool, take off the paper liners and carefully cut the bottoms off each cupcake top. The tops will be what you will use for the Ninja Turtle cupcake toppers and the bottoms can be snacked on right away or kept aside for another purpose such as cake pops or trifle.

For the Icing:
- 1 cup butter (softened)
- 4 cups icing sugar
- 2 TBSP milk or cream
- 1 tsp vanilla extract (optional)
- Gel food coloring (blue, orange, purple, red)
- Whip the butter for several minutes in stand mixer until light and creamy.
- Add icing sugar and milk/cream and mix slowly until incorporated. Add in vanilla extract if desired and beat on medium speed for 3 minutes. More milk or sugar can be added if needed to reach the right consistency for piping.
- Divide icing among 4 bowls and use gel food coloring to create each of the 4 Ninja Turtle mask colors – orange, red, blue and purple. To create my purple, I used a mixture of blue, pink and a touch of red.

To Assemble:
- Pipe a thick layer of icing onto 1 of the cut cupcake tops.
- Carefully add a second top to create a sandwich.
- Finish your Ninja Turtle Cupcake Popper by inserting two Wilton Candy Eyeballs to the colored icing mask.

Assemble Ninja Turtle Fruit and Veggie Platters:
These Ninja Turtle themed Fruit and Veggie platters were also something simple I put together for our Ninja Turtle birthday celebration for my son. They were easy to assemble on round dinner plates using a variety of fruits and vegetables including cucumber, celery, carrots, black olives, green grapes, honeydew melon, strawberries and blueberries. For the white of the “eyes” I used small plastic shot glasses filled with ranch dip for the veggies and French vanilla yogurt for the fruits.

And what goes better at a Ninja Turtle party then pizza? These platters made the perfect side to the pizza dinner we ordered in. Create a DIY pizza bar, or take the easy route and order in like I did – either way pizza is the perfect party food for this theme.

We’d like to send a big THANK YOU to Chantelle for sharing these adorable ideas & free printables with us. Her parties are always easy to recreate and kids love them! Be sure to follow her on Facebook to stay updated on all her fabulous ideas.
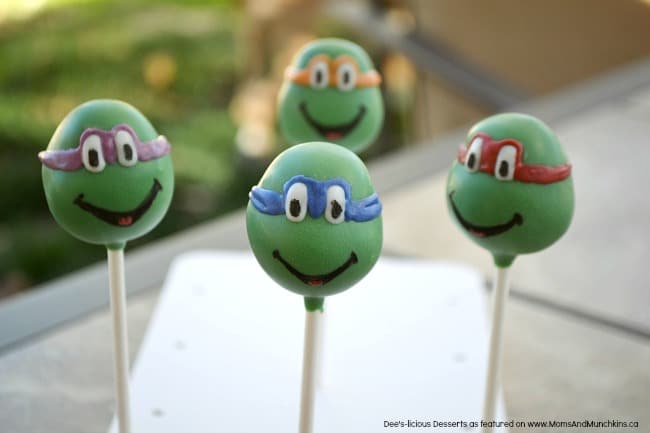
Don’t miss out TMNT category for more Ninja Turtle party ideas like these delicious cake pops by Deanna!
We’re always adding new ideas for parties and family fun. Never miss an update by following us on Facebook, Twitter, Pinterest, and sneak peeks on Instagram!
I’m the Editor of Fun Family Crafts and wanted to let you know that we have featured your TMNT project ideas! You can see the feature here:
http://funfamilycrafts.com/ninja-turtle-paper-plate-banner/
If you have other kid-friendly craft tutorials, we’d love for you to submit them. If you would like to display a featured button on your site, you can get one from the right side bar of your post above. Thanks for a fun project idea!
Just found this today. So much fun!! You make it look so easy. Do you still have the printable turtle faces to glue on the plates?
Hi Sara! Yes we do! It’s linked above but you can also get it directly from here:
https://www.momsandmunchkins.ca/wp-content/uploads/2016/03/NinjaTurtleBannerPrintable_DolledUpDesign.pdf
These are adorable. Thank you!
Thank you so much, Siri!
Thank you so much Cheryl. I work in an alternative school with four children who will love these………they’re perfect!!!
That’s great to hear, Sherry! Have fun!
Hello
I cant thank you enough for the wondeful ideas 🙂 God bless you!