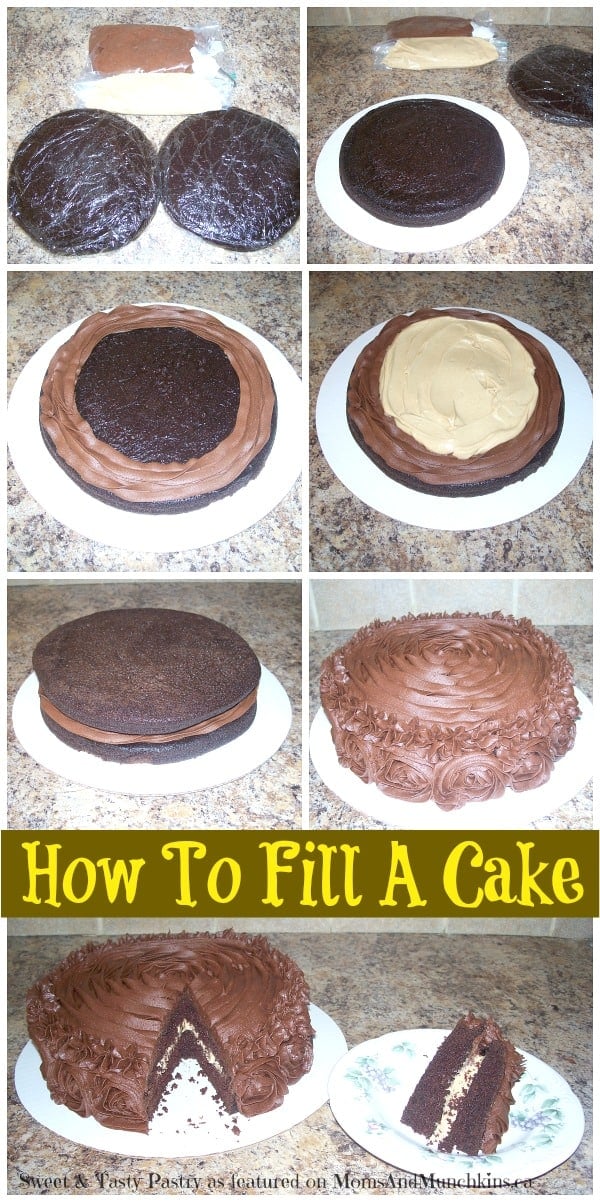
This post is courtesy of our Sunday Sweets contributor Melissa…When I first started out in cake decorating, I had the hardest time filling a cake. Whether it was with a fruit filling, pudding, mousse or another type of frosting other than the flavor I wanted to frost with, the filling would spill out or come through the sides of my cake and making a mess. In this tutorial I will show you how to fill a cake like a pro without the filling bleeding through on your beautifully frosted cake. For this tutorial I decided to do chocolate cake with peanut butter filling and chocolate buttercream which is my husband’s favorite.
Tutorial – How To Fill A Cake:
First, let’s start with your supplies. Here’s what you will need:
- 2 layers of cake (any size)
- filling
- frosting
- Ziploc bags
Bake your choice of cake according to recipe. Once the cake has finished baking and cooled slightly, I wrap the layers in plastic wrap to keep the moisture in for the rest of the cooling time. In the meantime, make the frosting and filling. Place frosting and filling into separate Ziploc bags. For this cake, I had the frosting bag fitted with the rosette tip to make decorating easier later.
Once the cake has cooled completely make sure that the layers are level. I eyeball it but there are great tools that can help with this. I got lucky with this cake and they baked pretty even so I left them as is. Place first layer cut side up on platter.
Using the bagged frosting, pipe a 1-2″ border around the outside rim of the cake. If you decide not to use a tip you can just trim off one bottom corner of the bag.
Then take the filling bag and trim off one bottom corner of the bag. Use this to fill in the frosting circle with your desired filling spreading evenly with a spatula if needed. Make sure to keep the filling away from the edge because once you put the top layer on it will spread out a bit.
Place the other cake layer cut side down on top of the filling. Make sure the layers are lined up so you have straight sides.
Take the frosting bag and frost the rest of the cake as desired. To save on time I covered this cake with large and small rosettes.
This is just one combination out of many that you can play around with. Get creative and have fun with different flavors.

For more delicious updates, follow us on Facebook, Twitter, Pinterest and Bloglovin’.

