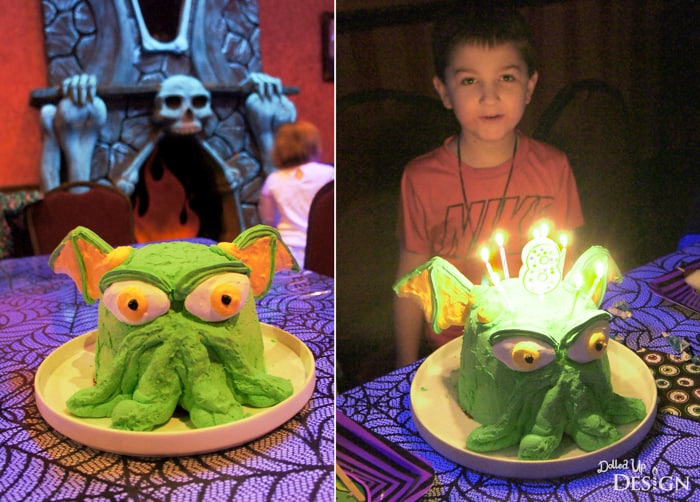
This DIY Ice Cream Cake recipe is courtesy of our contributor Chantelle of Dolled Up Design…The most important element of any birthday party has to be the Birthday Cake. For my son’s recent monster themed birthday party, he insisted that it be an ice cream cake and that it look like the mythical creature Cthulhu. Way to make things easy on mom!

My first thought was to order a cake from the nearest ice cream fast food restaurant and add some kind of printed topper or figure. Growing up we always had these type of birthday cakes and I loved going to pick out the design from the large binder in store. Now it feels like the design options are so much more limited and the cake costs have really skyrocketed. I wanted to try and keep costs down with the party so I decided the most frugal option would be to attempt my own ice cream cake at home.

This cake ended up being very easy to assemble and just required a bit of time in between each step to allow the ice cream to soften and then re-harden in the cake pan. I actually assembled everything a couple weeks before the party and had it in my freezer waiting to be iced and decorated the day before.
I wasn’t sure what kind of icing to use and was pretty happy with my final choice to use Ree Drummond’s “That’s the Best Frosting I’ve Ever Had!” recipe. It held its shape for the piping work I wanted to do and it froze nicely onto the ice cream cake. Another option I have seen in other recipes would be to use a sweetened and stabilized whipped cream to cover your ice cream cake.

For my eye and wing decorations, I ended up piping out and baking them as meringues shapes so they would be light and easy to stick to the cake. The meringue does not hold up all that well in the freezer, but it did the trick for the decoration I needed for the day of the big party.

DIY Ice Cream Cake:
By buying the tubs of ice cream on sale, I was able to get everything for just over half the cost of what it would have been to order a cake. My birthday boy got to choose the ice cream flavors he wanted (Birthday Cake Oreo) and I was able to decorate it like he wanted.
This is a recipe I will definitely be repeating in the future. My sister has made similar with Golden Oreos and caramel sauce in the middle, so I am looking forward to trying different flavor combinations. I may never bake an actual birthday cake again now that I know how inexpensive and easy I can make one out of ice cream!

- 2 tubs of different flavored ice cream (1.89L)
- 1 package of Oreos or similar sandwich cookies
- 1 bottle hot fudge sundae topping (or 1 batch homemade)
- Frosting:
- 5 Tablespoons flour
- 1 cup milk
- 1 teaspoon vanilla
- 1 cup REAL butter (do not substitute margarine)
- 1 cup granulated sugar (NOT powdered/icing sugar)
- Begin by preparing your pan. For my cake I used a large batter bowl to get the shape I wanted. I coated the inside of the bowl with coconut oil and layered the bowl with saran wrap to make it easy to slide the entire cake out afterwards. If you want a circular shaped cake, I recommend using a springform pan.
- Take out your first ice cream flavor and allow to soften 20-30 minutes. I knew I would be inverting the cake, so I began with the vanilla flavor I wanted on top of the cake. If you are using a springform pan, you would likely start with the chocolate. Once softened, spoon the ice cream to fill approximately half of your prepared pan and spread so the top is nice and even. Put back in freezer and allow to re-harden for at least an hour.
- Prepare your cookie crumb by putting the sandwich cookies in a Ziploc bag and breaking them up with a rolling pin or similar heavy object. This may also be done with a food processor.
- Warm the hot fudge slightly, following the directions on the bottle. Pour and spread an even layer over the surface of the ice cream and sprinkle desired layer of crushed cookies over the top. Place back in freezer for 30-60 minutes to harden.
- Take out your second tub of ice cream and allow to soften for 20-30 minutes. Spread in an even layer over the cookie crumble to fill the rest of the pan. Put back in the freezer to harden at least 2 hours, or overnight, before frosting.
- Remove from pan and frost with recipe below.
- Frosting (Adapted from Ree Drummond, The Pioneer Woman):
- Whisk flour into milk in medium sized sauce pan. Slowly heat over medium heat on the stovetop, stirring constantly until it thickens into a curd-like consistency. Remove from heat, stir in the vanilla extract, and allow to cool.
- While mixture is cooling, cream together the butter and granulated sugar in a stand mixer. Mix until light and fluffy, with all graininess removed – you may also use a superfine sugar to help this process.
- Add the cooled flour and milk mixture to the butter and sugar. Continue mixing in the stand mixer until it all combines and resembles whipped cream. If it starts to appear separated, just continue mixing at a high speed until it comes together.
- Tint as desired and spread or pipe onto cake. This is also delicious on baked cakes and cupcakes.
We’d like to send a big THANK YOU to Chantelle for sharing this recipe with us. Be sure to follow her on Facebook to stay updated on all her fabulous party and craft ideas.
