This Back To School Cookies tutorial is courtesy of our contributor Amy…September means SCHOOL, and nothing says school more than a classic #2 pencil! These adorable cookies are sure to please all the students and teachers in your life.

Back To School Cookies – Supplies:
- Favorite roll out cookie recipe (I used a chocolate dough for this project-YUM! LilaLoa has a fantastic recipe here)
- Gray icing (piping and 20 second consistency)
- Tan or ivory icing (20 second)
- Red icing (20 second)
- White (15 second)
- Egg Yellow icing (piping and 20 second consistency)
- Black edible marker
- Optional- Black piping icing
If you’re looking for a cute pencil shaped cutter, I just adore this one from Truly Mad Plastics. It’s the perfect size treat and offers plenty of space for adding personalization.
Mix, roll, cut and bake up your dough.

Using the 20 second gray icing, outline the metal section of the pencil between the eraser and pencil body- did you know this part is called “THE FERRULE?” Cookie decorating AND a fun fact!

Next add the sharpened section of your pencil. I used a tiny bit of Americolor warm brown to achieve this color. Start by piping a scalloped line straight across the cookie where the lower triangle begins. You can use 2 or 3 scallops, but be sure the points are facing away from you.

Fill in the whole section below your line with this icing. Use a scribe tool or toothpick to shape the icing and draw the points upward a bit.
Allow both sections of icing to dry at least 20 min.

Next, fill in the eraser using the red 20 second icing. Add a “reflection” by placing a drop of white icing directly onto the wet red icing. Use your scribe to shape the drop of white into a comma shape.

Next fill in the remaining section of the pencil using the egg yellow.


I added some cute little polka dots to my cookie for some pizzazz. If you’d like to add them simply drop in small staggered dots of white icing directly onto the wet yellow. Don’t add too much icing or it will overflow.

Allow this icing to dry for a few hours and then go back to add the details. Use your gray piping icing to make 4 horizontal lines across the metal section.
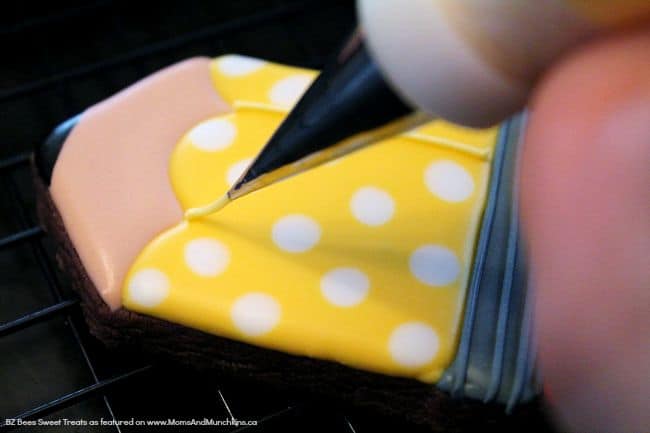
Use the yellow piping icing to draw a line from each scallop point vertically up the pencil. If you would like to personalize the cookie with a teacher or student’s name you can eliminate these lines for a larger, space to write.


Using your black edible marker, draw on the lead portion of the pencil. You can also write on any personalization with the marker, but I prefer the look of piped text. Totally up to you!


Here’s to a sweet and happy school year everyone!
We’d like to extend a big THANK YOU to Amy for sharing these cute Back To School cookies tutorial with us. Be sure to follow her on Facebook & Instagram for adorable cookie decorating ideas. You will LOVE her designs! I first came across her beautiful cookie creations on Instagram and I was immediately a fan of her work!! Have a special celebration coming up? You can also order cookies from her! Check out the FAQ section of her website for more information.
What is 20 second icing?
Hi there!
20 second icing is what I use when I don’t want to outline and flood a cookie in two steps. Basically, it’s a normal royal icing recipe thinned down with water. You should be able to drag a line through the icing and it will take about 20 seconds for the icing to flow back together and the line to disappear. The icing should flow but not be so funny that it drips off the edges of your cookie.
Sugarbelle has a wonderful blog post about icing consistency here:
http://www.sweetsugarbelle.com/2012/03/consistency-is-key-twenty-second-icing-and-more/