This April Showers Cookies tutorial is courtesy of our contributor Amy of BZ Bees Sweet Treats…The first signs of spring are finally starting to bloom but not without a few more rainy days ahead. These cheerful April Showers Cookies will have you looking forward to each little downpour.


The real standout on these cookies are the floral fondant accents. They’re a snap to make and completely edible. I used this silicone mold to make the assorted sizes of roses. Similar molds can be purchased to make 100’s of other shapes – jewels, buttons and bows just to name a few.
Before we hop into the written instructions, here’s a short video of the cookie decorating tutorial.
April Showers Cookies – What You’ll Need:
- Fondant – small pre-colored packages of fondant are available at most craft stores. I had white fondant available and just mixed in a tiny bit of food coloring. Start with a small handful of fondant and knead in a dab of color until you reach your desired shade. I recommend wearing gloves if you want to avoid stained hands!!
- Baby blue – flood consistency
- White – flood consistency
- Yellow – 15 second and piping consistency
- Black – piping consistency
- Green – piping consistency
- Leaf tip (I used a PME 50, but a Wilton 352 would also work)
- Petal or ruffle tip (I used a Wilton 101)

Using your blue flood icing, outline and flood the entire cookie.
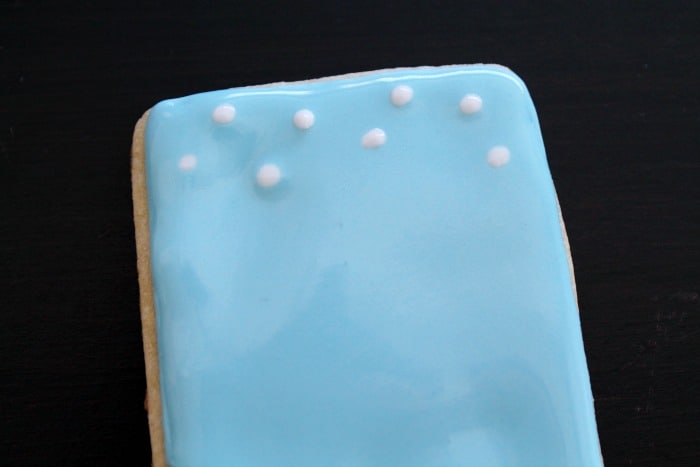
While this icing is still wet, add in a few rows of small white drops.
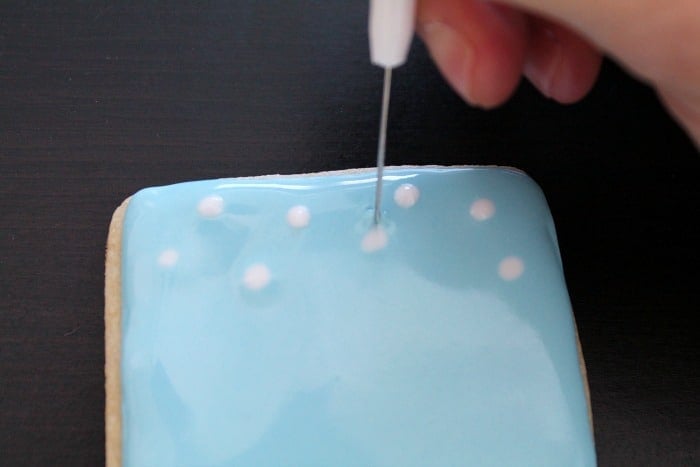
Use a scribe or toothpick to pull these dots into tear shapes. Start at the center of the dot and drag your icing towards the top of your cookie. Be sure to clean off your tool between each raindrop.

Continue adding drops and pulling into tear shapes until you are 3/4 of the way down your cookie. Let the icing dry while you start on the fondant accents.

Press a small ball of colored fondant into the desired size mold area. The fondant should fill in the indent but sit flush with the rest of the mold.

Gently bend the mold until the fondant starts to peel away. Remove and set aside to dry. Repeat with varying colors and sizes. Allow the fondant pieces to dry on a smooth surface. They should be solid enough to handle in about an hour.


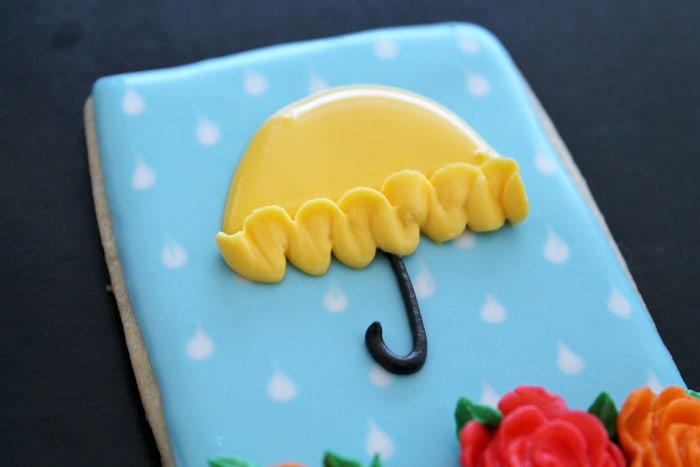
While your roses dry, add the umbrella. Make a half circle using your yellow 15 second consistency icing.

Add the handle using your black piping icing

Fit a piping bag with your leaf tip and green piping icing

Working one at a time, add a blob of green icing and immediately press on a fondant rose. I was able to fit 4 flowers across the bottom of my cookie.

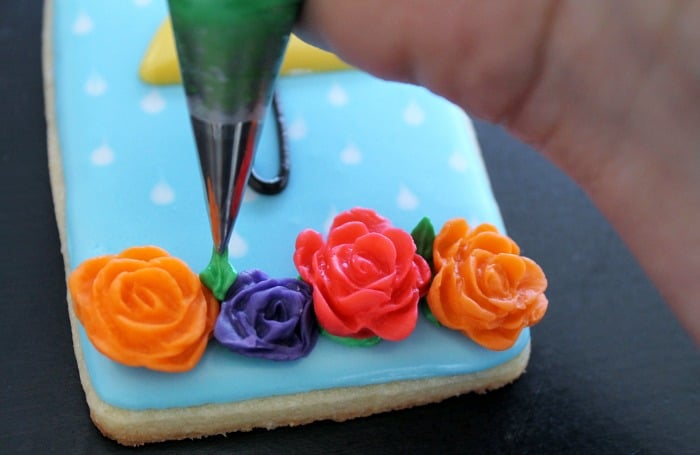
Next, add leaves between the flowers. This not only adds a pop of color, but also helps hold the fondant in place. Position the leaf tip with the points stacked vertically and barely touching the cookie. Apply gentle pressure and pull upwards and back. Release pressure and your icing should form a nice point.


Last we’ll add a cute little ruffle along the bottom of the umbrella. You’ll notice the tip has a wider end. Position your piping bag so the wide end barely touches the cookie and the narrow tip is angled upwards toward you. The ruffle effect can be done by piping a continuous line of letter “n”. Start at the left end of the umbrella and apply steady pressure as you gently move your tip up, right and down. Repeat along the length of the umbrella, remembering to keep the narrow tip angled towards you, wider end angled toward the cookie.


Cheery yellow umbrellas and bright flowers will have you wishing for more April showers!


We’d like to send a big THANK YOU to Amy for sharing these beautiful spring cookies with us. Be sure to follow her on Facebook & Instagram for adorable cookie decorating ideas. I first came across her beautiful cookie creations on Instagram and I was immediately a fan of her work! Have a special celebration coming up? You can also order cookies from her! Check out the FAQ section of her website for more information.
