This Sand Castle Cookies Tutorial is courtesy of our contributor Amy of BZ Bees Sweet Treats…My family went on an amazing vacation last month and we’re all still dreaming about those beautiful Caribbean beaches. I wish we were still building sand castles on a tropical island, but in the meantime these sand castle cookies will have to hold me over.


This adorable cookie cutter from Kalaidecuts really made the design pop. You can purchase one from their Etsy shop here. I just love all the unique shapes available in the world of 3D printed cutters. The possibilities are endless!

Sand Castle Cookies – What You’ll Need:
- Ivory 20 second icing
- Food-safe paintbrush (Wilton has a set 5 pc set available here)
- Light brown 20 second icing (I just added the tiniest smidge of chocolate brown coloring to my leftover ivory icing)
- Light brown piping icing
- 20 second icing in your choice of color for castle flag (I used blue)
- Optional – white fondant and silicone mold

Start by outlining a large center arch and windows on each of the castle turrets using your ivory icing. Make everything slightly larger than you want them to end up since the icing will spread a bit.

Next outline the entire cookie using the same icing. Leave the flag area blank for now.
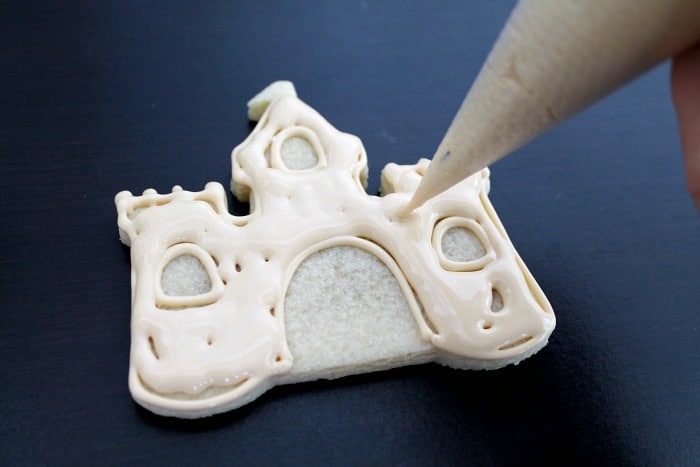
Immediately flood the cookie with ivory icing, leaving the outlined windows and doorway empty. Allow the cookie to dry completely before moving on to the next step.


Add some small squiggles of ivory icing randomly around the cookie.

Using your paintbrush, gently dab at the icing until it begins to flatten and spread. Keep working outward until you have a stippled icing effect all across the cookie. I just love how quick and simple it is to create a sandy texture!


While the first layer of “sand” dries, you can work on the edible fondant accents. I used this silcone mold along with plain white fondant. Press a little bit of fondant into the desired shape until it’s flush with the rest of the mold.

Gently bend the mold until the fondant begins to pull away. Remove and let the accents dry before handing.
You could also accent the cookies using sprinkles or just omit all together. The sand castles would be just as cute on their own!

While the accents dry, fill in the windows and doorway using the darker shade of icing.

Add just a few squiggles of light brown icing around the cookie and repeat the dabbing technique.

You don’t want to cover the first layer completely. This darker shade will just add a little extra dimension.


Using the piping consistency brown icing, add tiny beads of icing around the doorway and windows.

Next outline the entire cookie and pipe a rectangle around the top window.

Don’t forget to add the flag!


Once the fondant accents are dry, attach to your cookie using a dab of piping icing.
These cookies would be the perfect touch at any summer party or beach themed celebration. Try serving them on a layer of brown sugar or graham cracker crumbs for an extra touch of “sandy”sweetness!

We’d like to extend a big THANK YOU to Amy for sharing these fun sand castle cookies with us. Be sure to follow her on Facebook & Instagram for adorable cookie decorating ideas. You can also order cookies from her! Check out the FAQ section of her website for more information.

Thanks for sharing the informative information no text a really good post and hopeful that your will many more post like this one.