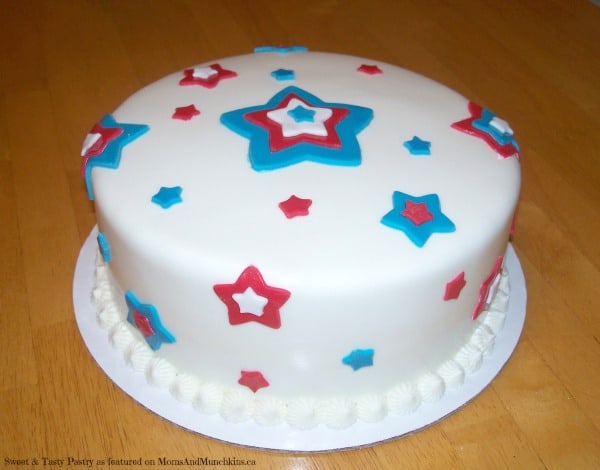
This How To Cover A Cake With Fondant tutorial is by our contributor Melissa…Wondering how to get that smooth look of fondant on a cake? It may be easier than you think!
What You’ll Need:
- fondant
- 2 layer cake
- buttercream frosting
- angled spatula
- fondant smoother
- pizza cutter
How To Cover A Cake with Fondant:
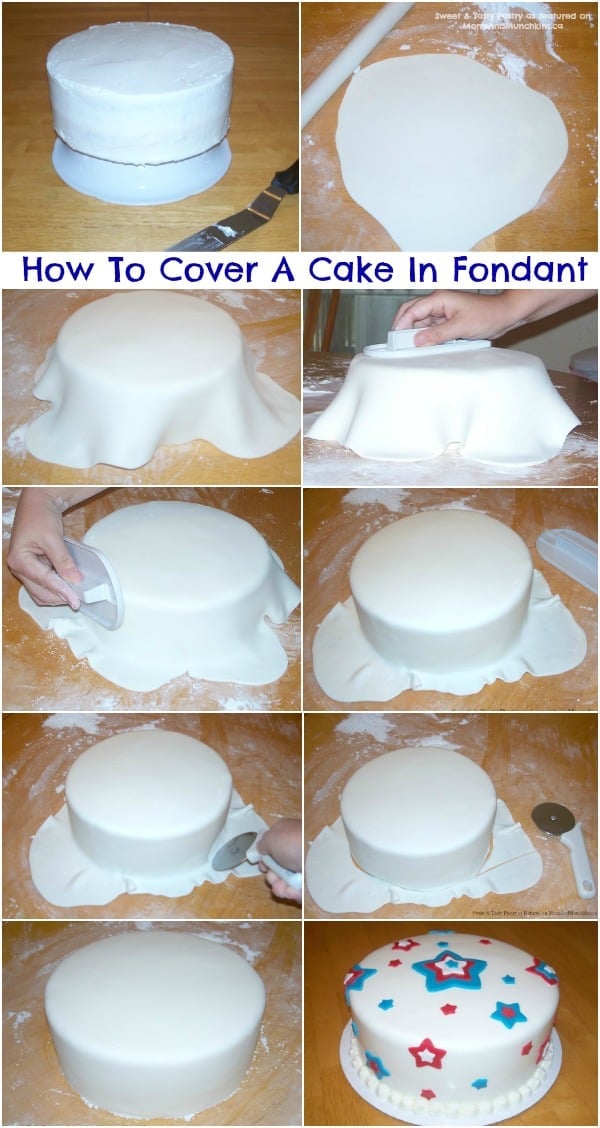
Fill and lightly frost cake with buttercream frosting using the angled spatula. Make sure the frosting is even all the way around. Place cake into the fridge until the buttercream is hard to the touch.

Once the buttercream is set, sprinkle your work space surface with confectioners’ sugar and knead your fondant until smooth. Sprinkle more sugar and roll the fondant out to the size of your cake. While rolling make sure to lift the fondant often, sprinkle more sugar and turn it slightly so it doesn’t stick to the surface of your work space.

Once it is the desired size slide both hands under carefully lifting and placing the fondant onto your cake.

Using your hands and/or a fondant smoother shape the fondant to the cake starting with the top of the cake and working down around the sides pushing any air bubbles down.

If you end up with an air bubble prick with something sharp such as a pin or toothpick and smooth over with your hands. Make sure the sides are smooth and even.

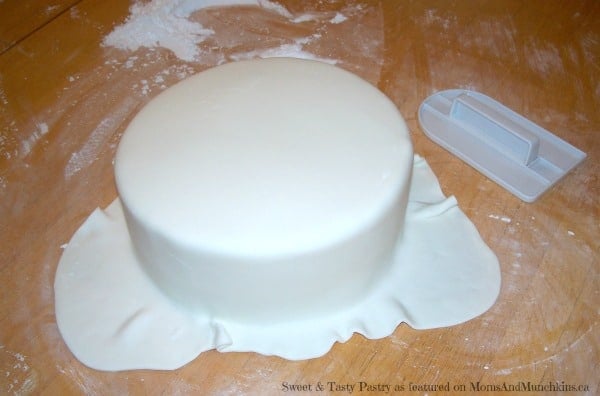
Let the excess fondant lay flat on the work surface. Take your pizza cutter and cut around the base of the cake.

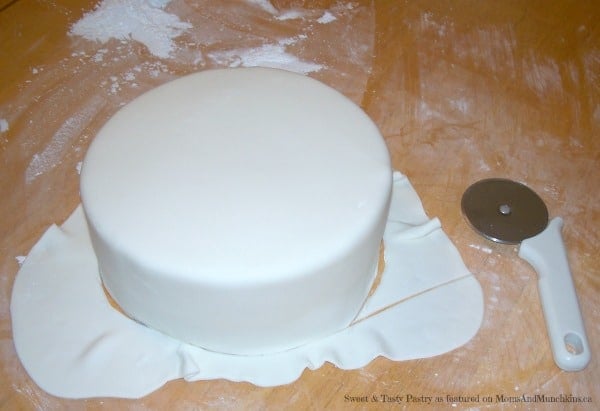
Pull away the excess and save for another project. Now your cake is ready to be decorated!

Thank you to Melissa of Sweet & Tasty Pastry for sharing this tutorial with us. Be sure to follow Melissa on Facebook for more delicious ideas. If you try this recipe, head over to her Facebook page to let her know what you thought of it. If you’re looking for a baker in Providence, Rhode Island, be sure to give her a call to discuss creative ideas.
For more delicious ideas, visit our special Easy Party Food & Family Recipes page. We’re always adding new ideas! Never miss a delicious update by following us on Facebook, Twitter, Pinterest, Google + and Bloglovin’.
Awesome tutorial. This is so simple!
Thank you! Yes, Melissa has such a great way of explaining things!
GREAT cake! Love this tutorial! I have yet to do this, you make it look so easy 🙂
Such a pretty cake – and great instructions on how to decorate it! Definitely a good choice for the Thursday Favorite Things Blog hop!
wonderful tutorial. I have never worked with fondant. Thank you for sharing your sweet blog at the Thursday Hop xo
I find thst if you chill your frosted cake really well it makes covering with fondant easier making it possible to lift and adjust if needed. Nice tutorial 👍
Excellent tip! Thank you for sharing.
With high humidity my cake was a disaster after putting it in the fridge….. one question please. How thick do you roll out the fondant before transfering it to the cake? Mine tends to tear….maybe to thin?
Hi Leonie! It may be too thin. You can also use a little bit of water on your fingers to reattach the torn pieces to each other.
Mmm beautiful cake i wish to do it but where to start and where to get the correct ingredients for fondant also on how to decorate please help out
Thanks for the tutorial. When I put the cake in freezer before covering, my fondant tend to be wet and takes longer time to dry. Also, I do have folds at the base after covering. Where I’m I getting it wrong?
How do you make the fondant
Hi Tara! You’ll find a recipe for fondant here: https://www.momsandmunchkins.ca/marshmallow-fondant-recipe/
How do you keep it from bunching up on the sides? The extra always bunches up on me. Grrr
Also I make my fondant using the marshmallow fluff.
1 large container of fluff
2 pounds powdered sugar
Is the other method better?