This Christmas Tree Cake Pops tutorial is courtesy of our contributor Deanna of Dee’s-licious Desserts…I went back and forth for a few days trying to decide what to do for November’s tutorial. I didn’t want to jump right into Christmas, because it’s not December, but everyone seems to be jumping the gun this year, so why not? I’m so very excited for the holidays this year! We have family in and out all December, and my son, about to turn 3 will finally get to experience the magic. So I wanted to do something cute, and simple, and cake up with this adorable Christmas tree. I hope you think she’s as cute as I do! Lets get started, shall we?
Christmas Tree Cake Pops – What You’ll Need:
- cake pop dough, shaped
- cake pop sticks
- green chocolate
- white chocolate
- yellow chocolate
- parchment paper
- toothpick
- squeeze bottle or baggie
- red pearl dust or something similar
- new paint brush
- edible marker
First things first, we need to top our cute little Christmas Trees with stars, so what I did was draw out some stars and taped parchment paper over them. Then I took my favorite chocolate squeeze bottle (or a baggie with the corner snipped) and filled it with yellow chocolate and traced the stars.

Once those stars harden you can set them aside for later.
Since we are going to make these stick up cake pops, you’re going to want to support the tip of your tree while you stick the pre-dipped stick into it. If you don’t chances are it’ll smoosh down and your tree won’t be very pointy.

Dip your entire cake pop into green chocolate, and before setting it down make sure the chocolate isn’t still running off. I always count to 30 before setting it down just to be sure.

When the chocolate has set, take a toothpick and lightly scratch the surface of the chocolate where you plan on placing her eyes and smile.
Now you’re going to use that pearl dust (you can purchase this online or a craft store – it is edible) and put on her rosy cheeks. Normally I don’t use the pearl dust for this, but I wanted her to be super shimmery and cute.


Take your edible marker and draw on her eyes and smile.


Take your toothpick and get a ball of white chocolate on the very tip of it. You’ll want it to be a ball because it’ll be easier to put on her tiny eye.


Gently poke the eye with the white chocolate and remove. Don’t swirl, don’t draw a circle, just poke it with your ball of chocolate. It’ll transfer in a perfect circle. Repeat for both eyes.
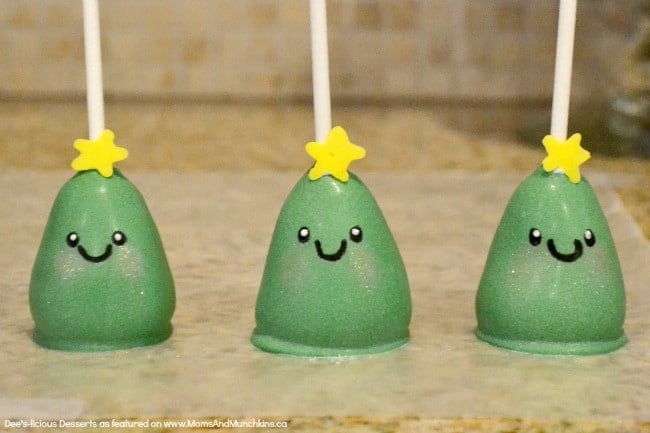
Last, take some chocolate and use it as glue to stick on one of those stars we piped out earlier.


And there she is, the cutest Christmas Tree you’ve ever seen! Will you eat her? I couldn’t…I shared with my neighbors. I just can’t bring myself to eat something so adorable. Hope you all are having a GREAT holiday season! See you next month.

We’d like to send a big THANK YOU to Deanna for sharing this adorable Christmas Tree Cake Pops tutorial with us. For more cute & delicious creations, follow Deanna’s Facebook page Dee’s-licious Desserts. You can check out all of Deanna’s delicious cake pop tutorials on Moms & Munchkins here.
These are so adorable!
Cheryl, These are so adorable! Pinning to share 🙂 Thank you for coming over and linking up with us at Brag About It! Hope you have a fabulous week!
~Laurie
These are so stinkin’ cute!
So adorable, the stars are my favorite part!